Showing posts with label Fiskars. Show all posts

12/13/2021

Christmas Card 2021


      Today, I would like to share my Christmas card with you. I know I've not shared here in a long while. I've been busy working on my writing projects. More coming on that soon. I'm having so much fun writing, but I had to take a day off so that I could play with my paper, ink, stamps and dies. A girl can only go so long without making a card. 

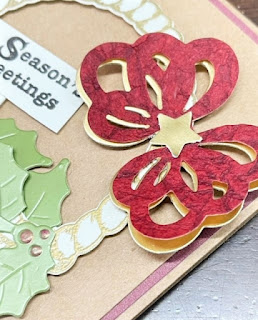
     The basket is heat-embossed in gold (Divinity Designs). The ivy and bow are die-cuts (Spellbinders Paper Arts). The sentiment also heat-embossed in black (Fiskars).


     Look at the detail in the bow. Isn't it gorgeous!?! The red layer is a kind of leather-like and is full of texture (the Paper Studio). The bottom layer is bright, metallic gold. They look so pretty together. 

********

Designer Tip:  Don't feel like you must create cards or other paper projects using only stamps and dies from one company. So many stamps and dies work beautifully together. There is one exception to keep in mind. If you are entering a challenge on a website, sometimes you must use only that company's products.

********

     Thanks so much for stopping in. Hope you have a wonderful Christmas surrounded by all those you love most. 

    Pamela 


1/13/2017

Paper Dress Card - DCWV Stack-a-holic, Jan 2017


Update:  Excited to find my card among the winning cards! Thanks so much to DCWV!  

    Ever wonder what happens if you cut an angel in half?!?


     It feels so so good to be back to my card making! I spent a lot of time browsing Pinterest and other web sites while my broken leg was healing these past five months. I saw a lot of paper dresses and wanted to try making one. I think the sketch from DCWV's challenge this month is the perfect forum for me to create my own paper dress.
     I used DCWV's The Painted Petals Stack, pre-embossed A2 cards and the clear Adhesive Jeweled Sheet to create my card. I began by die cutting two angels. Then, I cut the dark top-half off. I used the chad from the lighter purple to create an inlaid skirt. I used a heart for the bodice and diamonds for the waistband. Then, in a nod to my grannie who always made sure I had a nice and noisy cancan when I was growing up, I used a yellow flower die to create a cancan of sorts for my dress.
     There is still plenty of time to join in on the fun this month. Here's a link to the rules and a copy of the sketch we had to work with.
    And, so far, nothing bad has happened from my cutting an angel in half, so grab your scissors or paper trimmer and cut away.
     Other products used:

     Spellbinders Holiday and So Sweet dies
     Stampabilities Wire Dress Form stamp
     Fiskars That's Amore medium punch
     Our Daily Bread Designs Asters & Leaves die

     Thanks so much for stopping in. May the Lord be glorified by the work of my hands,
Pamela 

6/16/2016

CardMaker & Clearsnap Blog Hop


     Welcome to the CardMaker and Clearsnap Blog Hop and giveaway!


     I've had so much fun this week playing with the new ColorBox chalk inkpads from Clearsnap! I love working with chalks, especially when I'm in a hurry. No waiting around for the ink to dry before you can work on the next element. They dry instantly once you've stamped your image.
     I love how this card turned out. I know just which friend to send this to. She'll love it! But, I digress.
     I love the look of just a touch of color on the edges of my cards. For the small squares and the edges of this card, I tamped the paper edges against the  chalk inkpad. I adhered the squares with foam tape. Then, I stamped and die-cut the flowers, butterfly and sentiment. I finished it off with a few pearls on the butterfly and adhered him with foam tape.


     This card has a completely different feel about it. To create the front panel, I started with a sheet of watercolor paper. I trimmed it to size, and then I took two of the chalk pads (Cheeky and Splash) and rubbed them lightly across the paper. I wanted them to overlap where they met to create a third color.
     I stamped the flourish with the same color (Cheeky) I used on the background. I created the sentiment and border edges with the background color (Splash). As you can see, you can get lots of shades from the same chalk ink pad. 
--------------------------------------------
 
Thanks for hoping with us today! Your next stop is Chana's blog. 
 
---------------------------------------------
     Make sure you stop in at all the blogs and leave a comment. We love hearing from you!
     Clearsnap is our host for today's blog hop and and very generous giveaway. They are giving $50 worth of ColorBox products to one lucky hopper. Good luck!
 
     If you get lost or find a broken link, you can go back to CardMaker's blog where there is a complete list of  participating hops. 


Materials List:
     chalk inks-   ColorBox by Clearsnap
                            Splash (16018)
                            Chive (15285)
                            Lipstick Red (16071)
                            Cheeky (15316)
     cardstock-   heavy-duty cream(the Paper Studio 667998)
                            heavy-duty white(the Paper Studio 227041)
     watercolor paper-   Canson
     stamps-        flowers & sentiment (Sizzix 657776)
                            flourish (Inkadinkado 97634)
                           sentiment (Fiskars, Forever Friends Quotes)
     adhesive-    double-sided and foam tape (3M)
     tools-            1/4" heart punch (Fiskars)
                           die cutter


4/07/2016

CardMaker & Ranger Industries Blog Hop


     Welcome to the CardMaker and Ranger Industries Blog Hop!

     This week we, the members of the CardMaker Blog Team, have been playing with the new Tim Holtz water-reactive Distress Crayons. To be quite honest, I was really nervous about today's blog hop. I am more of a stamper than a painter-with-pigment kind of card maker. But, I surprised myself! I had so much fun with these Distress Crayons!
     To get the hang of working with these new crayons, I experimented on some scraps of cardstock first. After just a few tries, I found what worked best for me - work in small areas and smudge with a wet finger. I am really pleased with how my card turned out.
     To begin, I created a 4.25"x5.5" card base with heavy-duty cream cardstock. I heat-embossed a clear background onto another panel of heavy-duty cream cardstock.
     Then, I began coloring. I applied some of the crayon to my cardstock in a small area and with a wet finger smeared it out and over my background. With a wet paper towel, I gently wiped across the embossed areas to allow the embossing to show. I kept coloring little by little with different colors until my panel was all covered. I adhered it to my card with foam tape.
     I stamped over one of my practice-panels and trimmed it to use as the first piece of a freestyle-collage embellishment. I adhered the collage to my card with foam tape.
     I had so much fun learning to use these Distress Crayons! The colors are so vibrant. But, they can also be very soft depending upon how much water you use with them. It's all up to you. With a wet paintbrush, they also make an ombre look very easy to achieve.
     Thanks so much for hopping along with us today! Give these Tim Holtz Distress Crayons a try. I know I will be using my set often!

     Be sure and stop by my fellow Blog Team member's blogs and see all the inspiration they have to share with you today.

     Your next stop is at Carisa's blog.

    Below is a full list of participating blogs just in case you started here or get lost along the way.

   Have a wonderful day, Pamela


     Materials used:
          Distress Crayons-   (Ranger, Tim Holtz pack TDBK47919
                                               seedless preserves TDB49630
                                               chipped sapphire TDB49609
                                               festive berries TDB49586)
                                             
          cardstock-                heavy-duty cream (the Paper Studio 667998)
                                              navy, pink, purple (the Paper Studio 449769)
 
          stamps-                     background (Hero Arts, Line Dots CG316)
                                              butterfly (Unity Stamp Co, Butterfly Endearment UK-777A)
                                              sentiment (Hero Arts, CL342)
                                              dots (Fiskars, All Year Cheer 03-013370)
 
          ink-                            black dye (Memories BLACK-020MEMB)
                                              watermark pigment (VersaMark VM-001)
 
         embossing powder- clear (JoAnn Craft Essentials)
 
          dies-                           circles (Spellbinders GLD-005)
                                              confetti (Our Daily Bread Designs, CSBD15)
 
          brad-                         black (Recollections 356862)
 
          gems-                        purple (Studio G WM0161)
 
          paperclip-                mini (Tim Holtz, ideaology TH92791)

          adhesive-                  foam tape (Scotch 3M)

10/26/2015

Published in CardMaker Magazine, Winter 2015 Issue


     I am so honored that CardMaker Magazine chose to publish one of my cards in the Winter 2015 issue.
      If you would like to make my card, you can visit www.CardMakerMagazine.com/ to download the Winter 2015 issue today or pick up a print edition of CardMaker magazine which will be on your local newsstand.

9/12/2015

DCWV Stack-a-holic Card Challenge, Sept 2015

     UPDATE: So excited to find my card on the list of winners! Thanks so much DCWV!
      Time for another DCWV Stack-a-holic Card Sketch Challenge already! The time if flying by here.
     I used the The Good Wood Stack to create this Thanksgiving card. There are just so many beautiful wood grains in that stack. I used Fiskars' Quilt Star to punch my embellishments. I cut two of each different one and then stacked them with foam tape.
     There is still lots of time if you want to play along with us. Here's the link to all the rules and a copy of the sketch here too.
 

     Thanks so much for stopping in. I'll be looking forward to seeing your card on the DCWV Facebook page.
    May the Lord be glorified by the work of my hands,
Pamela


8/07/2015

Color Challenge ODBDSLC249

     So happy to have you stop by. Today, I have a card for the color challenge at Our Daily Bread Designs.


     The colors in this week's challenge are my favorite colors to work with. You can find the colors and a link to all the fun below.
     I used the No Words (G515) stamp collection from ODBD for this card. ODBD has some of the best sentiment stamps on the market.
     To make my heart chain, I first ran some cardstock through a crimper. I punched some small hearts from the crimped cardstock. I set the hearts aside for another project. Next, I punched a larger heart right over the negative space of the first heart. After deciding how I wanted my hearts to interlock, I made a cut in each heart and slipped it through the next heart. I hid the cut behind the overlapped heart.
     I used a border punch on the edge of my matting panels and rounded the corners of my purple card base.
     There is still time if you want to come play with us. Details here: http://www.ourdailybreaddesignsblog.blogspot.com/2015/08/odbdslc249-color-challenge.html

     May the Lord be glorified by the work of my hands,
 Pamela

2/11/2015

DCWV Stack-a-holic Card Challenge February 2015

      Happy Valentine's Day! Hope you have someone special to love.
     I have two cards to share today. Both use the same sketch (below), but I need a feminine and a masculine card this year.
      Both cards use cardstock from the CANDY CANE LANE stack from DCWV. I just love finding ways to use Christmas papers in other ways like here with my Valentine's cards.
     As you can see in this feminine version I used the CLEAR ADHESIVE JEWELED SHEET also from DCWV. I love these sheets! So easy to cut and so elegant.
     I made the flowers using Our Daily Bread Design's Aster dies and Fancy Foliage dies.
 
      Now for the masculine version. The letters LYM stand for "love you millions" which my husband, Jeff, and I use to sign off on all our emails to each other. I used Fiskar's heart punch for the hearts on this card.
      And, here they are side by side.
     There is still plenty of time to create your own card and join in the fun over at DCWV. Here's the sketch we had to work with this month and a link for all the details to play along. http://dcwvinc.blogspot.com/2015/02/februarys-stack-holic-challenge.html


 May the Lord be glorified in the work of my hands,
Pamela

12/22/2014

DCWV December Stack-a-holic Card Challenge

      Where does the time go!?! Already time for another monthly challenge at DCWV!
     I do thank you for stopping in. I know how busy we all get just a few days out from Christmas. I'm planning to send this Christmas thank-you card to Mom. She loves red, so I know this card will be a hit with her!
     I used the CANDY CANE LANE STACK from DCWV to make my card for this month's Stack-a-holic Challenge.
     Other products I used are:
          Fiskars:  All Year Cheer (sentiment)
          Our Daily Bread Designs: Sparkling Snowflakes stamps
          Our Daily Bread Designs: Snowflake dies
          McGill:  tag punch
          Ranger:  white pigment
          StampinUp:  white embossing powder
          Recollections:  white pearls
     There is still time to join in the fun. Here's a copy of the sketch DCWV gave us to work with as well as the link to get all the details.  http://dcwvinc.blogspot.com/2014/12/december-stack-holic-challenge.html
     Thanks again for popping in! Hope you have a wonderful Christmas,

Pamela


7/07/2014

Summer Lovin' Challenge CFC133

    Thanks so much for stopping in today. I so enjoy your visits and comments.
     Today, I have a card for CAS-ual Fridays' challenge. The point of this challenge is to create a clean and simple card using hearts and summery colors. Except for the stem, I made all parts of my flower with hearts.
     Using the medium and large That's Amore heart punches from Fiskars, I punched four large hearts from the beautiful, dark coral, water-colored cardstock in The Solstice Stack from DCWV. I also punched one large green heart and a medium green heart. To make the flower, I overlapped one heart onto another using all four hearts. I used the small green heart at the bottom of the petals. I cut and adhered a stem to the blossom. I cut the large green heart in half and added them as leaves. I used foam tape to adhere the blossom to my card. The sentiment is a vellum quote(ColorBok) which I ran through my Xyron sticker maker.
     There is still plenty of time if you want to play along with us. Check out the details here: http://cas-ualfridays.blogspot.com/2014/06/cfc133.html The deadline is noon on July 18th. So, jump in and start creating.
     I pray that you are having a wonderful, blessed day.

7/02/2014

Win a Copy of "Max, the Boy Raindrop" from Darice

     Just popping in to let you know that Darice, a leading company in the craft industry, is giving away an autographed copy of my newest book, Max, the Boy Raindrop, on their Facebook page. Darice generously supplied the embossing folders to help me tell Max's story. Be sure to check them out. They have lots of fun products.
 
     Max is available as a soft-bound book as well as an e-book. Order through your local bookseller or preferred on-line retailer.
          978-1-4908-2866-4 (soft cover ISBN)
          978-1-4908-2867-1 (e-book ISBN)


6/15/2014

DCWV June Stack-a-holic Card Challenge

UPDATE: Just found out that my card was among the winners at DCWV! Thanks so much to DCWV for another great challenge. You can see the other winners here:   http://dcwvinc.blogspot.com/2014/07/dear-crafty-friendsjune-stack-holic.html


   Hello, my sweet friends! So nice of you to pop in. Today, I have a card for the June Stack-a-holic challenge at DCWV.
     I used DCWV's The Coral Couture Stack to create my card. DCWV provided a great sketch(below) to work with this month. I did not have the die to make my rings, so I made my own. Using Fiskars 1.5" circle punch and Spellbinders 1" circle die, I created 12 rings. I ran them through my Xyron sticker maker and adhered them to the front of 12 more 1.5" circles. I used foam tape to attach them to my card. I stamped the sentiment (ODBD Friendship collection), and then added pearls and other embellishments.
     Here's a close-up of the circles.
     There is still plenty of time to join in the fun. Check out the details here:

http://dcwvinc.blogspot.com/2014/06/june-stackaholic-challenge.html

6/09/2014

Introducing "Max, the Boy Raindrop"


    Max is ready to meet the world! I'm so excited to let you know that my new book is available for purchase. Max lives in e-book and softcover printed-book formats so you may have whichever is your preference.
     Max, the Boy Raindrop is an adventurous, fast-paced story about a scared raindrop who must overcome his fear of raining. He learns that oftentimes just grabbing hold of a friend's hand can be the beginning of courage.
      For those friends of mine in the card-making and scrapbooking world, you will be pleased to know that I created all the illustrations myself using only cardstock and paper-crafting tools. A big thanks goes to Core'dinations ColorCore Cardstock, Darice, and Fiskars who so generously supplied cardstock and paper-crafting tools to help me tell Max's story. They will all have copies to give away on their blogs.
     As time goes by, I will be sharing some specific techniques I used for Max's story like punching, dry-embossing, tearing, design, color choice and cutting the tiniest pieces of paper. Every eyebrow, every eyelash even, I created from cardstock.
     Thanks so much for sharing in my excitement today! I will be looking forward to Max living in your home. Here is the info to order if you are interested. You may order an autographed copy directly from me. Email me at phaskin@hotmail.com for info.
     You may also order it through your local bookseller or preferred online retailer like www.amazon.com or www.bn.com. You may also order directly from my publisher (A division of Thomas Nelson) at:
softcover - http://bookstore.westbowpress.com/Products/SKU-000700312/Max-the-Boy-Raindrop.aspx 
e-book http://bookstore.westbowpress.com/Products/SKU-000700313/Max-the-Boy-Raindrop.aspx .
          softcover ISBN:  978-1-4908-2866-4
          e-book ISBN:  978-1-4908-2867-1          
A really big thanks goes to the bravest man I know, my husband Jeff. And, a big thanks to Belan, Jan, Sherri, and Glenda, my writer's group who believed in my talent and prodded me along all the way.

11/12/2013

DCWV November Stack-a-holic Challenge

    UPDATE: I'm so excited to learn my gift tag made the TOP-10 winners list at DCWV! You can check out the other winners here: http://dcwvinc.blogspot.com/2013/12/november-stack-holic-challenge-top-10s.html

 Thanks for popping in today. Hope you are enjoying your winter. Mine has been really busy, but not too busy for another Stack-a-holic challenge from DCWV. Instead of a card challenge this month, we have an ornament challenge, or a gift-tag if we prefer.

     This is my year for gift-tags, I guess. I've had several challenges asking for gift-tags recently. I made this tag as a Christmas tag, but I could easily use it for a number of occasions.
     Here's how I made this one. I cut a light minty-green tag shape (2.5" x 7") from DCWV's Homespun Cardstock Stack - my absolute favorite stack of all time. All other paper for this tag comes from DCWV's Handy-Dandy Stack. I punched a double-loop edge (Martha Stewart) on the bottom end of the tag. I cut a smaller panel from a coordinating patterned paper and adhered it along the side. I ran a small strip of light red/dark rosy patterned paper through my crimper (Fiskars) and matted it with a white panel that was also trimmed with the double loops.
     To make my medallion, I punched a 12" length of a lattice chain edge (EK Success) from the same paper as the side panel. I scored it every 1/2" and fan-folded it into a medallion. It is so pretty and lacey in person. I adhered the snowflake brad (the Paper Studio) with hot-glue in the center.
     I heat-embossed the to-from tag (Fiskars)  in white ink and white embossing powder on the back of a scrap left over from the minty green tag. Then, I punched two holes and laced a length of white, satin ribbon between them. I also added a ribbon to the back so I can tie the tag to a present.
     There is still plenty of time to play along with us. Here's a copy of the sketch we had to work with and a link to all the rules. http://dcwvinc.blogspot.com/2013/11/november-stack-holic-challenge.html

11/06/2013

Handmade Elements Challenge

    Thanks for stopping by today. Always love your visits. I'm playing along this week in Core'dinations ColorCore Cardstock online crop and getting a head start on my Christmas cards.

     The challenge here was to make a card using handmade elements. I made my Christmas tree with two sizes of heart punches (Fiskars). I used two shades of olive and dark rosy red from Core'dinations Nostalgia collection.
     First, with the lighter olive, I embossed - well actually I debossed because I got the paper against the plate (Spellbinders) upside down. But, I liked it so I went with it. I sanded the cardstock and punched four large and one small heart, turned them so the pointy end was up, and glued them together to make a tree. I decorated with pearls and a star which began life as a flower. I adhered the tree with foam tape to the rosy red panel.
     I cut a same-size panel of darker olive and embossed it with a folder (Sizzix) and fussy-cut the center out. I added thicker foam tape to adhere the top panel.
     You still have time to play along. Check the Master Challenge list here: http://www.coredinations.com/index.php/2013/10/31/master-challenge-list/